
Caramel apple cheesecake bars THANKSGIVING RECIPE
There’s something magical about autumn that transforms an ordinary weekend into baking season. Maybe it’s the crisp air creeping through your kitchen window, or the sudden appearance of caramel and apple everything on every menu. But here’s the truth: you don’t need to visit a fancy bakery to enjoy café-quality desserts. You just need the right recipe and a little confidence in your baking abilities.
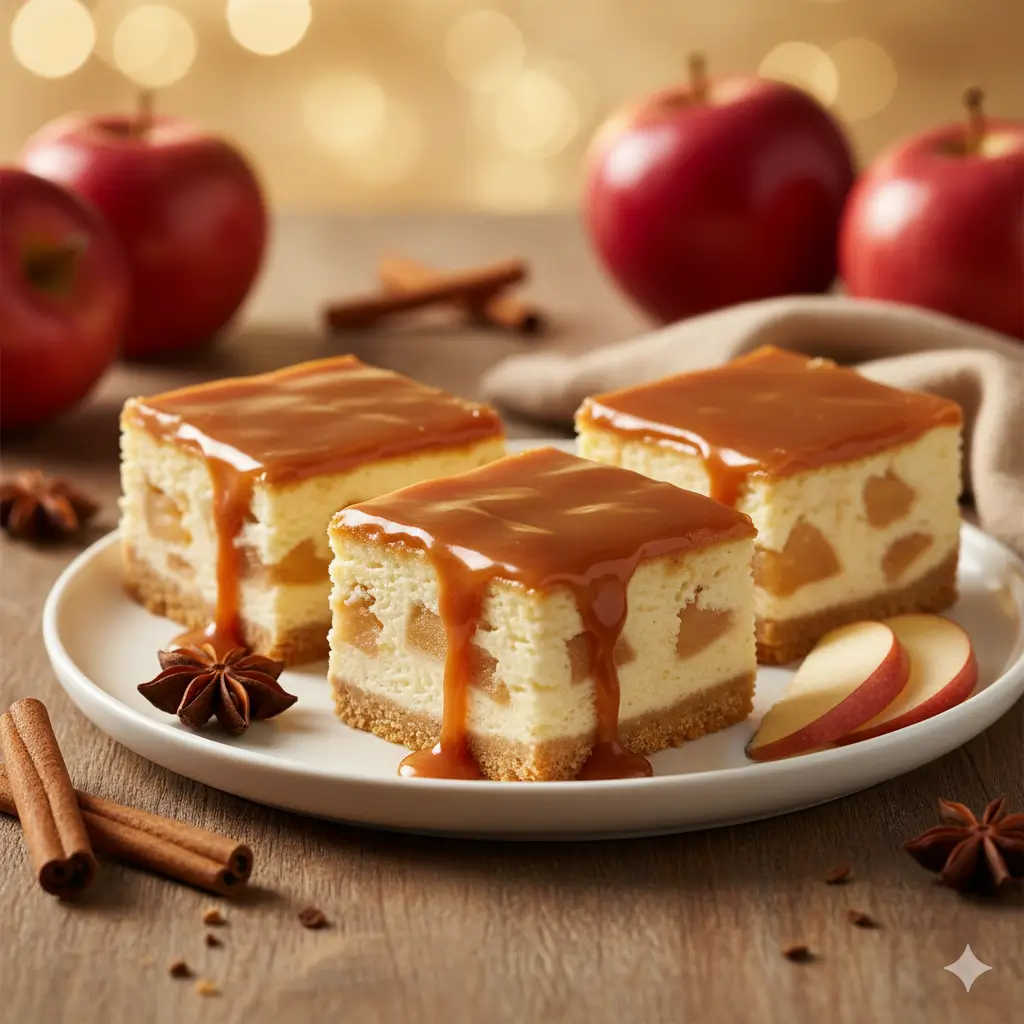
If you’ve ever stood in front of your oven wishing you could recreate that perfect combination of tart apples, rich caramel, and creamy cheesecake, then caramel apple cheesecake bars are about to become your new favourite go-to dessert. These bars are the ultimate trifecta of fallflavourss buttery, indulgent, and surprisingly easier to make than you’d think. Whether you’re baking for a family gathering, potluck, or simply treating yourself after a long week, this recipe delivers bakery-quality results with minimal fuss.
Why Caramel Apple Cheesecake Bars Are Worth Making
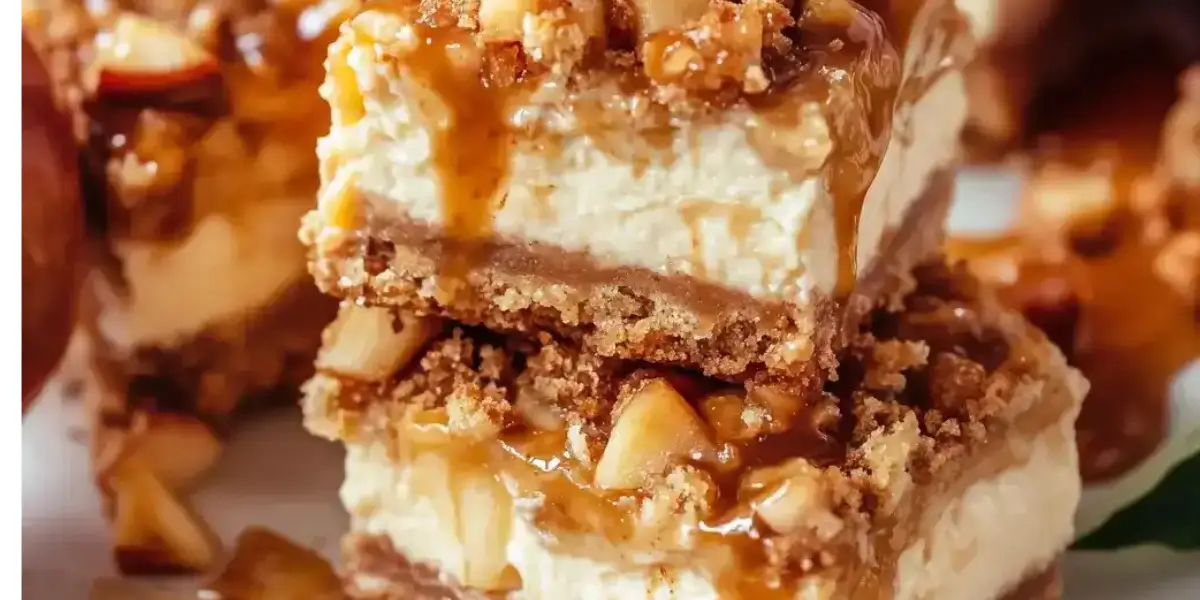
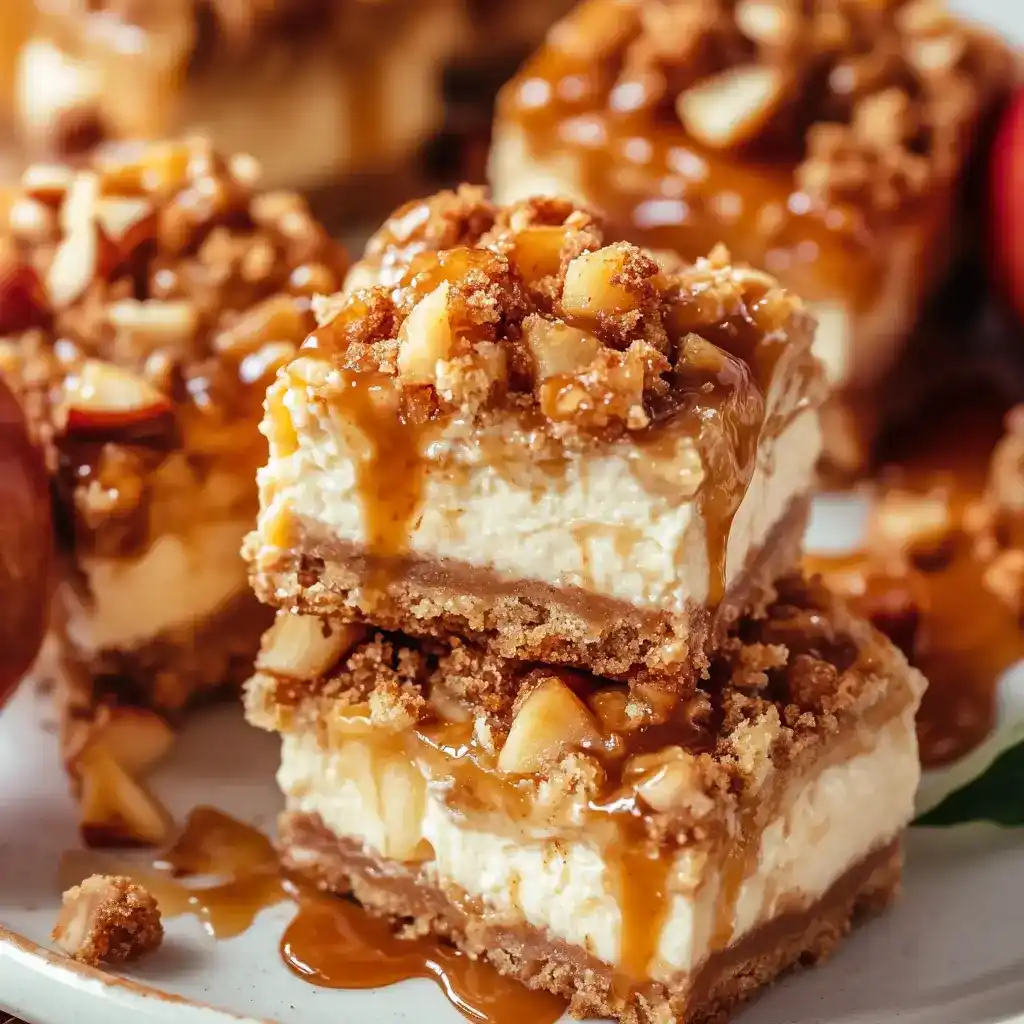
Caramel apple cheesecake bars represent everything people love about comfort desserts. They combine the nostalgia of a caramel apple from the county fair with the sophisticated elegance of a creamy cheesecake. The layered structure, re buttery crust, smooth cheesecake filling, spiced apples, and ribbons of caramel create a textural experience that keeps people coming back for seconds.
Beyond flavour, these bars offer practical advantages for home bakers. Unlike traditional cheesecakes that require precision baking and special equipment, caramel apple cheesecake bars are forgiving and require only basic kitchen tools. They’re also perfect for feeding a crowd since you can cut them into individual portions and serve them at room temperature, making them ideal for gatherings where oven space is limited.
Essential Ingredients for Perfect Caramel Apple Cheesecake Bars
The Foundation: Crust and Cheesecake Layer
Creating the perfect base is crucial for your caramel apple cheesecake bars to turn out right. Your crust acts as the structural foundation, while your cheesecake layer provides that signature creamy richness everyone craves.
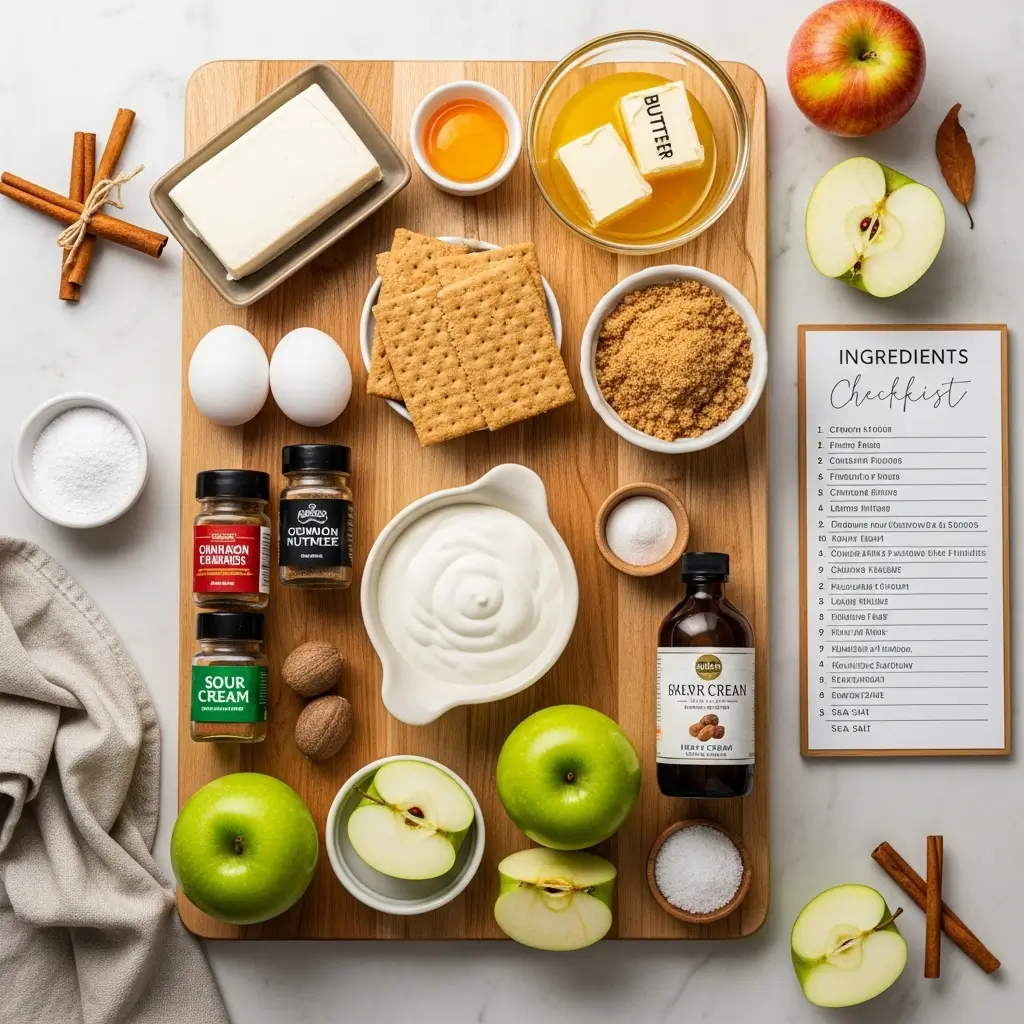
For the Graham Cracker Crust:
- 1½ cups graham cracker crumbs (about 10-12 crackers)
- ⅓ cup granulated sugar
- 5 tablespoons melted butter
- Pinch of sea salt
For the Cheesecake Layer:
- 16 oz cream cheese, softened to room temperature
- ½ cup granulated sugar
- ¼ cup sour cream
- 1 teaspoon vanilla extract
- 2 large eggs
- 2 tablespoons all-purpose flour
Apple and Caramel Toppings
The magic of caramel apple cheesecake bars lies in the topping layer, which brings together seasonal produce with rich caramel sauce.
For the Apple Layer:
- 3 medium Granny Smith apples, peeled, cored, and thinly sliced
- 3 tablespoons unsalted butter
- ¼ cup packed brown sugar
- 1 teaspoon ground cinnamon
- ½ teaspoon ground nutmeg
- ¼ teaspoon ground ginger
- 1 tablespoon lemon juice
- 1 tablespoon cornstarch
For the Caramel Drizzle:
- ½ cup granulated sugar
- 6 tablespoons unsalted butter
- ¼ cup heavy cream
- 1 teaspoon vanilla extract
- ½ teaspoon sea salt
Master the Technique: Making Caramel Apple Cheesecake Bars Step-by-Step
Caramel Apple Cheesecake Bars
Ingredients
Method
- Step 1: Preheat oven to 325°F and line 9×13 inch baking pan with parchment paper.
- Step 2: Mix graham cracker crumbs, sugar, melted butter, and salt. Press into pan bottom. Bake 8-10 minutes until golden. Cool 5 minutes.
- Step 3: Beat softened cream cheese until fluffy. Add sugar, sour cream, and vanilla. Mix in eggs one at a time on low speed. Fold in flour gently.
- Step 4: Pour cheesecake filling over cooled crust. Bake 20-25 minutes until edges set but center jiggles slightly.
- Step 5: Heat butter in skillet. Add sliced apples, brown sugar, cinnamon, nutmeg, ginger, and lemon juice. Cook 5-7 minutes until tender. Add cornstarch and stir 1 minute.
- Step 6: Spread apple mixture evenly over baked cheesecake layer.
- Step 7: For caramel: Heat sugar in heavy saucepan over medium-high heat until amber colored (5-7 minutes). Remove from heat. Add butter carefully. Let bubble settle, then stir in heavy cream, vanilla, and salt.
- Step 8: Drizzle caramel over apple layer. Bake additional 10-12 minutes.
- Step 9: Cool completely at room temperature for 2 hours, then refrigerate at least 4 hours (overnight is best).
- Step 10: Cut into 12 squares using a knife dipped in hot water. Serve cold or at room temperature.
Preparing Your Crust and Baking Base
The foundation of great caramel apple cheesecake bars begins with proper preparation. Start by preheating your oven to 325°F and lining a 9×13-inch baking pan with parchment paper, allowing some overhang on the sides for easy removal. This simple step will save you from frustration when removing your finished bars.
Combine your graham cracker crumbs, sugar, melted butter, and salt in a mixing bowl, stirring until the mixture resembles damp sand. Press this mixture firmly into the bottom of your prepared pan, creating an even layer about ¼ inch thick. Use the bottom of a measuring cup to ensure consistent pressure across the entire surface. Bake this crust for 8-10 minutes until it becomes fragrant and slightly golden. Remove it and allow it to cool for 5 minutes before adding your cheesecake layer.
This brief pre-baking step isn’t optional; it prevents your crust from becoming soggy during the extended baking time and ensures a satisfying crunch with every bite.
Creating Your Silky Cheesecake Layer
Room temperature is your secret weapon for a smooth, lump-free cheesecake filling. Take your cream cheese out of the refrigerator at least 30 minutes before you plan to mix it. Using an electric mixer on medium speed, beat the cream cheese for 2-3 minutes until it becomes light and fluffy. Avoid the temptation to rush this step. Proper aeration creates that characteristic tender texture.
Gradually add your sugar while continuing to beat, then mix in the sour cream and vanilla extract. Once combined, reduce your mixer speed to low and add your eggs one at a time, mixing on low speed after each addition. Finally, gently fold in your flour with a spatula to incorporate it without deflating your mixture.
Pour this filling over your cooled crust, smoothing the top with an offset spatula. This layer should be about ½ inch thick. Bake at 325°F for 20-25 minutes until the edges are set but the centre still jiggles slightly when you gently shake the pan. This slight jiggle indicates that your cheesecake will continue cooking as it cools, preventing overbaking and ensuring a creamy texture.
Building the Apple and Caramel Layers
While your cheesecake bakes, prepare your apples. Heat the 3 tablespoons of butter in a large skillet over medium heat. Add your sliced apples, brown sugar, cinnamon, nutmeg, ginger, and lemon juice. Cook for 5-7 minutes, stirring occasionally, until the apples soften slightly but still hold their shape. They should be tender enough to fold slightly but not mushy. Sprinkle the cornstarch over the apples and stir for another minute to thicken the mixture slightly.
Once your cheesecake layer has baked and cooled for 5 minutes, spread the apple mixture evenly over the top. Don’t worry about creating a perfectly smooth layer; the rustic appearance of apple slices actually adds to the homemade charm.
For your caramel, combine the sugar in a heavy-bottomed saucepan over medium-high heat. Don’t stir; instead, swirl the pan occasionally as the sugar melts, watching for an amber colour. Once the caramel reaches the desired golden-amber shade (about 5-7 minutes), remove it from the heat and carefully add your butter. The mixture will bubble. This is normal. Let it settle for a few seconds, then stir in your heavy cream. Add the vanilla extract and sea salt, stirring to combine.
Allow the caramel to cool for 2-3 minutes before drizzling it over your apple layer. This prevents the caramel from soaking completely into the apples and maintains those beautiful drizzle lines.
Final Baking and Cooling
Bake your assembled caramel apple cheesecake bars for an additional 10-12 minutes until the apples are heated through and the caramel has set slightly. Then here comes the hardest part: let them cool completely at room temperature for at least 2 hours. This resting time allows the bars to set properly and ensures clean cuts.
Once cooled, refrigerate for at least 4 hours (or overnight, which is ideal) before cutting. This extended chill time helps the caramel harden and makes slicing infinitely cleaner.
Ingredient Comparison: Key Components Explained
Here’s your info formatted into a clean table:
| Component | Purpose | Key Tips |
|---|---|---|
| Graham cracker crust | Provides buttery, crunchy foundation | Pre-bake to prevent sogginess |
| Cream cheese filling | Creates the signature creamy layer | Enhances fall flavour profile |
| Sour cream | Adds tanginess and prevents cracking | Non-negotiable ingredient for best results |
| Granny Smith apples | Offers tartness to balance sweetness | Slice thinly for even cooking |
| Caramel sauce | Adds rich, buttery sweetness | Watch closely to avoid burning |
| Spices (cinnamon, nutmeg, ginger) | Enhances fall flavor profile | Use room temperature for a smooth texture |
Troubleshooting Your Caramel Apple Cheesecake Bars
Preventing Common Baking Mistakes
Even experienced bakers encounter challenges with caramel apple cheesecake bars. The most common issue is cracking, which occurs when your cheesecake layer overbakes or cools too quickly. The key to avoiding this is not rushing the cooling process. Leave your bars undisturbed at room temperature for a full 2 hours before refrigerating.
If your caramel sauce becomes too thick after cooling, simply gently reheat it over low heat or add a teaspoon of heavy cream to loosen it. Conversely, if your caramel seems thin, you may have removed it from the heat too early. Next time, wait for a deeper amber colour, though dark caramel burns quickly, so watch carefully.
Storage and Serving Suggestions
Properly stored caramel apple cheesecake bars keep beautifully for up to 5 days in an airtight container in your refrigerator. You can also freeze them for up to 2 months. Wrap individual bars in plastic wrap and store in a freezer-safe container. Simply thaw in the refrigerator for 2-3 hours before serving.
These bars taste excellent cold straight from the refrigerator, but many people prefer them at room temperature for maximum flavour. If you’ve refrigerated them and want to serve at room temperature, remove them from the fridge 30 minutes before serving.
Variations and Creative Twists on the Classic Recipe
Seasonal and Flavour Adaptations
Once you’ve mastered the classic caramel apple cheesecake bars recipe, you can begin experimenting with variations. Try using half apples and half pears for a sophisticated twist, or add candied pecans to your topping for extra crunch. Some bakers swirl salted caramel directly into their cheesecake filling before baking for a completely different texture experience.
For a brown butter variation, brown your butter before incorporating it into your crust, adding a subtle nutty complexity that pairs beautifully with the apples and caramel. You might also experiment with different apple varieties. Honeycrisp apples add a different sweetness level, while Pink Ladies bring a subtle tartness.
Frequently Asked Questions About Caramel Apple Cheesecake Bars
Q: Can I make caramel apple cheesecake bars without a water bath?
A: Yes, and that’s actually the beauty of this recipe format. Because these are bars rather than a full cheesecake, and they’re shallower, you don’t need a water bath. The shorter baking time at a lower temperature (325°F) prevents the edges from overbaking while the centre sets. This is one reason caramel apple cheesecake bars are more forgiving than traditional cheesecake.
Q: How far in advance can I prepare caramel apple cheesecake bars?
A: You can prepare caramel apple cheesecake bars up to 2 days before serving. In fact, they often taste even better after sitting for a day because the flavours have time to meld together. Store them in an airtight container in the refrigerator and keep the caramel drizzle to a minimum on the top layer to prevent it from absorbing too much moisture. You can always add fresh caramel to individual servings just before serving.
Q: What’s the best way to cut caramel apple cheesecake bars cleanly?
A: Clean cuts are all about the right tool and technique. Use a sharp knife dipped in hot water and wiped clean between each cut. This warms the caramel enough to cut smoothly without dragging. If your bars have been refrigerated, allow them to sit at room temperature for 15 minutes before cutting. You might also try using dental floss (unflavored) stretched tight between your hands to slice through it cleanly; it works surprisingly well.
Elevating Your Baking Game: Pro Tips from Experienced Bakers
Going beyond the basic recipe opens doors to creating restaurant-quality caramel apple cheesecake bars that impress everyone at your table. Consider making your own caramel sauce rather than using a store-bought version. It’s easier than you think and tastes infinitely better. The flavour of homemade caramel carries notes of brown butter and vanilla that commercial versions often lack.
Temperature control is perhaps the most overlooked factor in successful caramel apple cheesecake bars. Ensure all your ingredients, especially cream cheese, are at room temperature before you begin. Cold cream cheese creates lumps that no amount of mixing can fix. Similarly, allowing your baked bars to cool slowly prevents thermal shock that causes cracking.
Consider making these bars part of your holiday or seasonal baking tradition. There’s something special about dedicating a fall afternoon to mixing, baking, and drizzling caramel over homemade bars. Your kitchen will smell incredible, and the satisfaction of serving something you created from scratch is unmatched.
Final Thoughts: Making Caramel Apple Cheesecake Bars Your Own
Creating caramel apple cheesecake bars at home transforms a seemingly complicated dessert into an achievable and rewarding baking project. By understanding each component’s role from the foundational crust to the final caramel drizzle, you gain the confidence to troubleshoot issues and make creative adjustments based on your preferences.
The beauty of these bars lies in their flexibility. They’re elegant enough for formal gatherings yet casual enough for family brunches. They showcase your baking skills while requiring less technical precision than traditional cheesecake. And perhaps most importantly, they deliver that perfect combination of creamy, tart, buttery, and caramelised flavours that make fall feel like home.
The next time you’re planning a dessert that needs to impress, or you simply want to treat yourself and your family to something special, remember that bakery-quality caramel apple cheesecake bars are just one afternoon of baking away. Your kitchen, your table, and everyone you share these with will thank you.
Don’t let another season pass without making these stunning caramel apple cheesecake bars. Gather your ingredients this week, set aside an afternoon, and follow this recipe step-by-step. Share your creations with friends and family, and don’t be surprised when they ask for the recipe. Better yet, tag us on social media with your baking photos. We’d love to see your homemade masterpieces. Happy baking, and may your kitchen fill with the aroma of cinnamon, apples, and caramel!
Caramel Apple Cheesecake Bars
Reviews & Ratings from Our Baking Community
Why Customers Love This Recipe
Featured Customer Reviews
⭐ Share Your Experience
Have you made these caramel apple cheesecake bars? We’d love to hear about your baking experience!
