
Chocolate Thumbprint Cookie Recipe : A Recipe That Never Disappoints
There’s something undeniably magical about the simple gesture of pressing your thumb into warm cookie dough. Maybe it’s because baking a chocolate thumbprint cookie recipe feels less like following instructions and more like creating edible memories with your own hands. I still remember the first time my grandmother taught me her chocolate thumbprint cookie recipe—I was barely tall enough to see over the kitchen counter, and my tiny thumbprint left the most uneven indent you’ve ever seen. Yet somehow, when those cookies emerged from the oven with their glossy chocolate centres, they tasted like pure love.
Whether you’re a seasoned baker or someone who nervously eyes the flour aisle, this chocolate thumbprint cookie recipe is about to become your secret weapon for impressing family and friends. These beautiful, jewel-like treats are forgiving, customizable, and deliver restaurant-quality results in less than an hour. Let’s dive into everything you need to know about creating the perfect batch of chocolate thumbprint cookies.
Understanding Your Chocolate Thumbprint Cookie Recipe Foundation
The Science Behind the Perfect Chocolate Thumbprint Cookie Base
Every great chocolate thumbprint cookie recipe starts with understanding the dough itself. The base of your chocolate thumbprint cookies isn’t just any cookie—it’s a carefully balanced combination of butter, sugar, eggs, and flour that creates the ideal texture: tender enough to hold your thumbprint without cracking, yet sturdy enough to support a generous helping of chocolate filling.

The magic in your chocolate thumbprint cookie recipe lies in the creaming process. When you beat room-temperature butter with sugar for at least 2-3 minutes, you’re creating tiny air pockets that help your cookies rise and develop their characteristic tender crumb. This step is non-negotiable if you want chocolate thumbprint cookies that melt in your mouth rather than feeling dense and heavy.
The addition of egg yolks (not whole eggs) in many chocolate thumbprint cookie recipes serves a crucial purpose. The yolk’s fat content enriches the dough and helps bind ingredients while adding moisture. Vanilla extract and a pinch of salt round out the flavour profile, making your chocolate thumbprint cookie recipe taste more complex and sophisticated than the sum of its parts.
Choosing Quality Ingredients for Your Chocolate Thumbprint Cookie Recipe
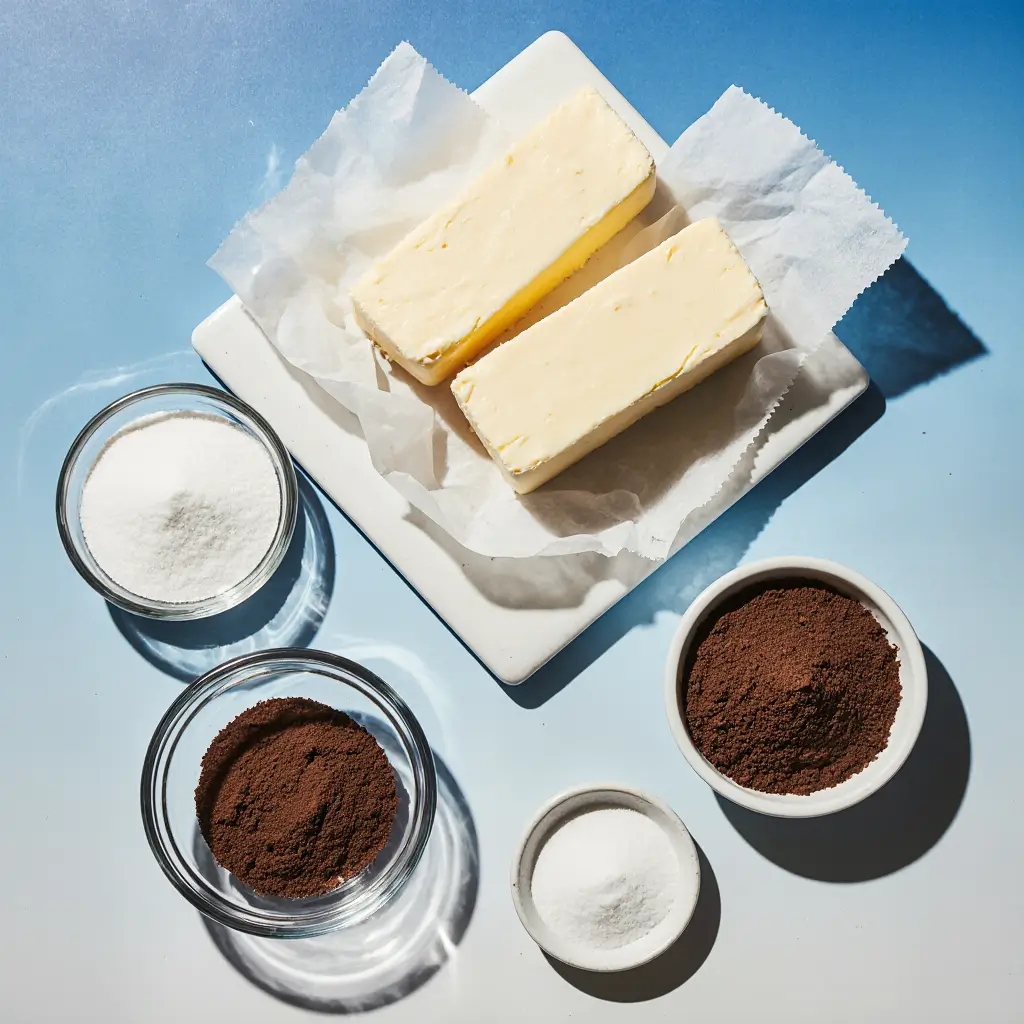
Your chocolate thumbprint cookie recipe is only as good as its ingredients. Start with unsalted, high-quality butter—this gives you control over the salt level and ensures a pure butter flavour that shines through. For the chocolate filling in your chocolate thumbprint cookies, opt for chocolate chips or chopped chocolate with a cocoa content of at least 50%. This prevents the filling from being overly sweet and masks the flavour of your carefully crafted cookie base.
Don’t overlook the flour either. All-purpose flour works wonderfully in a chocolate thumbprint cookie recipe, but some bakers prefer a combination of all-purpose and cake flour to create an even more tender crumb. The ratio of 3:1 all-purpose to cake flour makes a noticeable difference in the delicacy of your chocolate thumbprint cookies.
Mastering the Technique of Making Chocolate Thumbprint Cookies
Step-by-Step Instructions for Your Chocolate Thumbprint Cookie Recipe
Making chocolate thumbprint cookies follows a straightforward process, but precision matters. Start by preheating your oven to 350°F (175°C). In a mixing bowl, cream together 1 cup (2 sticks) of softened butter with ¾ cup of granulated sugar and ¼ cup of packed brown sugar until the mixture is light and fluffy—this should take about 3 minutes with an electric mixer.
Add 1 egg yolk and 1 teaspoon of vanilla extract, beating until fully incorporated. In a separate bowl, whisk together 2 cups of all-purpose flour, ¼ teaspoon of salt, and ¼ teaspoon of nutmeg (this adds subtle warmth to your chocolate thumbprint cookies). Gently fold the dry ingredients into the wet mixture until just combined.
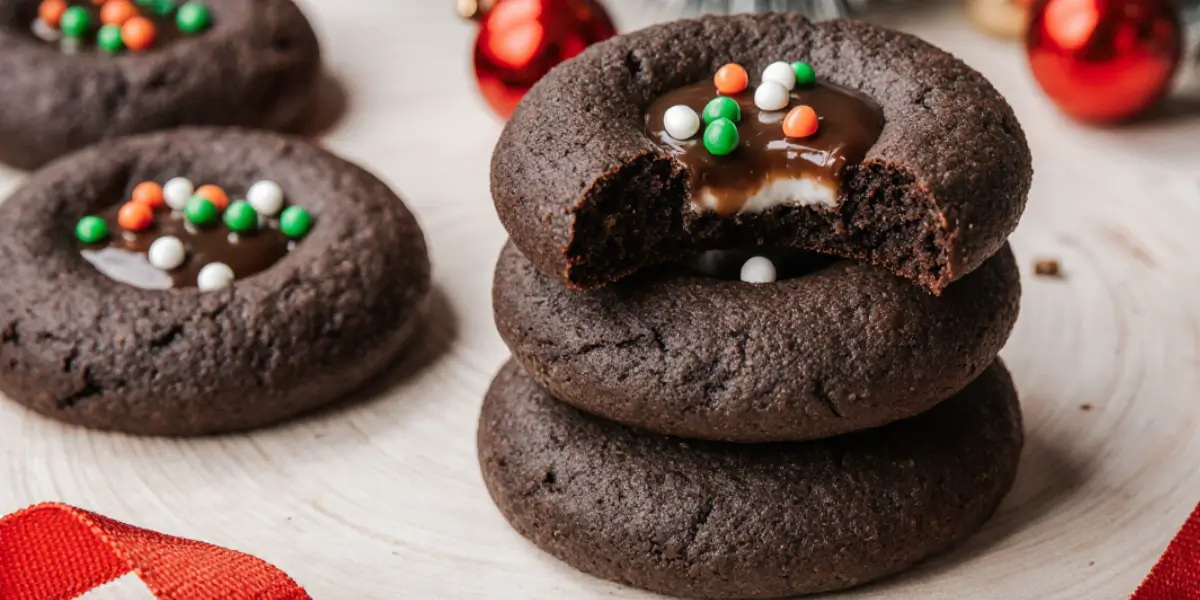
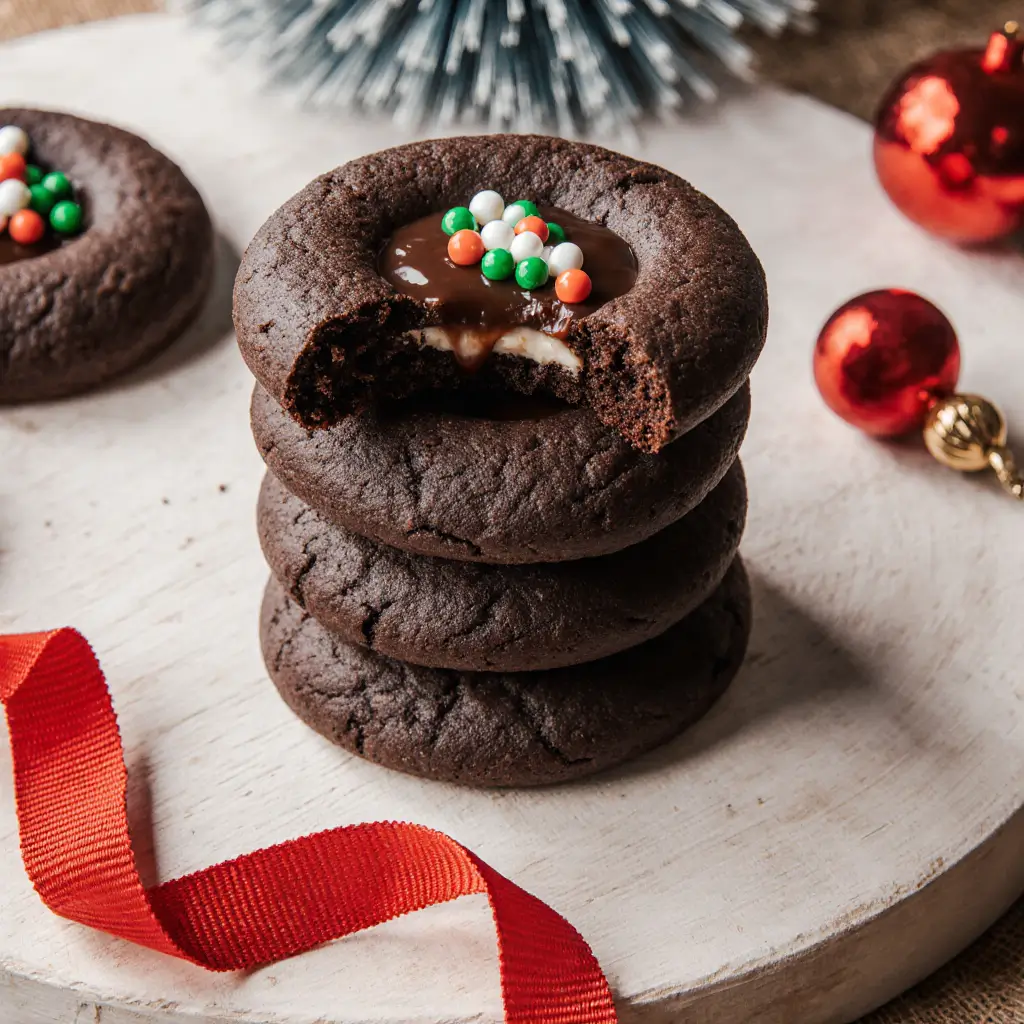
For your chocolate thumbprint cookie recipe, rolling the dough into 1-inch balls is essential. Place these balls on parchment-lined baking sheets about 2 inches apart. Here comes the technique that makes these chocolate thumbprint cookies special: gently press your thumb into the centre of each ball, creating an indent about ½ inch deep without breaking through the bottom. This is the defining feature of chocolate thumbprint cookies.
Bake your chocolate thumbprint cookies for 10-12 minutes until the edges are just barely golden. Remove them from the oven and immediately fill each indent with chocolate chips or a small dollop of chocolate ganache while the cookies are still warm. The residual heat will slightly melt the chocolate, creating those gorgeous, glossy centres that make chocolate thumbprint cookies so visually stunning.
Troubleshooting Common Issues in Your Chocolate Thumbprint Cookie Recipe
Even experienced bakers encounter challenges with chocolate thumbprint cookies. If your thumbprints are spreading and losing shape, your dough is likely too warm. Refrigerate it for 15-30 minutes before shaping. If the chocolate filling isn’t melting into the indent, your oven temperature might be too low, or you’re filling after the cookies have cooled completely.
Cracked cookies indicate that your dough is either too dry or was overmixed. When making chocolate thumbprint cookies, mix just until the dry ingredients disappear. If your chocolate thumbprint cookies are spreading excessively during baking, your flour-to-fat ratio might be off, or your butter was too soft when you started. Next time, ensure your butter is at room temperature but still slightly firm to the touch.

Chocolate Thumbprint Cookie Recipe
Ingredients
Method
- Step 1: Preheat and Prepare
- Preheat oven to 350°F. Line baking sheets with parchment paper.
- Step 2: Cream Butter and Sugars
- Beat together unsalted butter, granulated sugar, and brown sugar for 2-3 minutes until light and fluffy.
- Step 3: Add Wet Ingredients
- Mix in egg yolk and vanilla extract until fully incorporated.
- Step 4: Combine Dry Ingredients
- Fold in flour, salt, and nutmeg until just combined. Do not overmix.
- Step 5: Shape Dough
- Roll dough into 1-inch balls. Place on prepared baking sheet, spacing 2 inches apart.
- Step 6: Create Thumbprints
- Gently press your thumb into the center of each dough ball to create an indent about 1/2 inch deep.
- Step 7: Bake
- Bake for 10-12 minutes until edges are lightly golden.
- Step 8: Fill with Chocolate
- Remove from oven and immediately fill each warm indent with chocolate chips. Let melt for 1-2 minutes.
- Step 9: Cool
- Cool on baking sheet for 10 minutes, then transfer to wire rack. Allow chocolate to fully set before serving.
Creative Variations and Storage of Your Chocolate Thumbprint Cookie Recipe
Delicious Flavour Variations to Enhance Your Chocolate Thumbprint Cookie Recipe
While the classic chocolate thumbprint cookie recipe is undeniably perfect, experimenting with variations keeps things exciting. One popular twist involves adding 2 tablespoons of cocoa powder directly into the dough itself, creating chocolate thumbprint cookies with a subtle chocolate flavour that complements the filled chocolate centre beautifully.
Another approach to customise your chocolate thumbprint cookie recipe is to swap the chocolate filling with different options. Raspberry jam, dulce de leche, caramel, or white chocolate create entirely different experiences while maintaining the structure that makes chocolate thumbprint cookies special. Some bakers love combining a layer of jam with chocolate on top, creating sophisticated chocolate thumbprint cookies with complex flavours.
For holiday variations, try adding ½ teaspoon of peppermint extract to your chocolate thumbprint cookie recipe, then fill with dark chocolate and crushed candy canes. Or create a salted caramel version by filling your thumbprint indents with salted caramel, then topping with a sprinkle of fleur de sel. The possibilities with a versatile chocolate thumbprint cookie recipe are genuinely endless.
Proper Storage and Serving Tips for Your Chocolate Thumbprint Cookie Recipe
Your chocolate thumbprint cookie recipe yields cookies that stay fresh for up to 5 days when stored correctly. After the chocolate in your chocolate thumbprint cookies has completely set (usually 30 minutes to 1 hour), transfer them to an airtight container. Place parchment paper between layers to prevent the chocolate from sticking to the cookies above.
Store your chocolate thumbprint cookies at room temperature, away from direct sunlight and heat sources. Avoid refrigerating unless your kitchen is extremely warm, as this can cause condensation and make the cookies sticky. If you’ve made chocolate thumbprint cookies ahead and want to freeze them, they keep beautifully for up to 3 months in a freezer-safe container. Thaw them at room temperature for about 2 hours before serving.
For an elevated presentation, dust your chocolate thumbprint cookies with powdered sugar or a light cocoa powder just before serving. The contrast of white powder against dark chocolate creates an irresistible visual appeal that makes chocolate thumbprint cookies look like they came from a professional bakery.
Chocolate Thumbprint Cookie Recipe Reference Table
| Component | Measurement | Notes |
|---|---|---|
| Butter (unsalted) | 1 cup (2 sticks) | Must be room temperature |
| Granulated sugar | ¾ cup | For sweetness and structure |
| Brown sugar (packed) | ¼ cup | Adds molasses depth |
| Egg yolk | 1 | Use only the yolk for richness |
| Vanilla extract | 1 teaspoon | Pure vanilla recommended |
| All-purpose flour | Spoon and a level to measure | Enhances all flavours |
| Salt | ¼ teaspoon | A spoon and a level to measure |
| Nutmeg | ¼ teaspoon | Optional but recommended |
| Chocolate chips or chopped chocolate | ¾ cup | 50% cocoa content minimum |
| Baking temperature | 350°F (175°C) | Standard for thumbprint cookies |
| Baking time | 10–12 minutes | Until edges are golden |
| Yield | 24–30 cookies | Depends on size |
Frequently Asked Questions About the Chocolate Thumbprint Cookie Recipe
Q: Can I make my chocolate thumbprint cookie recipe ahead of time?
A: Absolutely! Your chocolate thumbprint cookie recipe dough can be prepared up to 2 days in advance. Store it in an airtight container in the refrigerator. You can also freeze shaped cookie balls (before baking) for up to 3 months. When ready to bake, add 1-2 minutes to your baking time since they’ll go directly from freezer to oven. Many bakers find that pre-made dough makes their chocolate thumbprint cookies even easier to prepare during busy seasons.
Q: What’s the best chocolate to use in my chocolate thumbprint cookie recipe?
A: While chocolate chips work conveniently, chopped bars of high-quality chocolate create a more luxurious chocolate thumbprint cookie recipe. Look for chocolate labelled “couverture” or with cocoa percentages between 50-70%. Avoid chocolate with excessive fillers or additives. Some bakers melt their chocolate with a tiny bit of coconut oil to make it flow more smoothly in chocolate thumbprint cookies. The quality of chocolate directly impacts the final taste of your chocolate thumbprint cookie recipe.
Q: How do I prevent my chocolate thumbprint cookies from spreading too much?
A: Spreading issues typically mean your dough for the chocolate thumbprint cookie recipe needs chilling. Refrigerate the dough for at least 30 minutes before shaping. Additionally, ensure your baking sheets are cool before placing dough on them—warm sheets cause immediate spreading. Using parchment paper instead of greased baking sheets also helps, as it conducts heat more evenly. If you’re making multiple batches, refrigerate your chocolate thumbprint cookie recipe dough between batches.
Conclusion: Your Journey to Perfect Chocolate Thumbprint Cookies Begins Now
Creating beautiful, delicious chocolate thumbprint cookies is within your reach, regardless of your baking experience. This chocolate thumbprint cookie recipe combines simple ingredients with straightforward techniques to deliver impressive results that taste as wonderful as they look. The elegance of chocolate thumbprint cookies lies not in complicated procedures but in attention to detail and using quality ingredients.
Whether you’re baking these chocolate thumbprint cookies for a holiday gathering, a special occasion, or simply to treat yourself on a Wednesday afternoon, you now know how to create batches of perfection. Remember that each time you make this chocolate thumbprint cookie recipe, you’re building experience and intuition. Your first batch might not be Pinterest-perfect, and that’s completely okay. Your chocolate thumbprint cookies will still taste delicious, and each batch will improve as you become familiar with your oven and preferences.
The beauty of chocolate thumbprint cookies is their versatility and charm. This chocolate thumbprint cookie recipe welcomes experimentation, customisation, and personal touches. Add a pinch of espresso powder to enhance the chocolate flavour, swap fillings based on what you have on hand, or create gift boxes of chocolate thumbprint cookies for people you care about. These aren’t just cookies; they’re edible expressions of care and creativity.
Ready to create your masterpiece? Gather your ingredients, preheat that oven, and start making your chocolate thumbprint cookie recipe today. Your kitchen is about to smell absolutely incredible, and your taste buds are about to experience pure joy. Don’t forget to share photos of your finished chocolate thumbprint cookies on social media—we’d love to see how your baking adventure unfolds! Have you tried a chocolate thumbprint cookie recipe before? Share your favourite variations and tips in the comments below.
