
How to Make a Homemade Carvel Ice Cream Cake Recipe That Rivals the Original
Remember that moment when you bit into a slice of Carvel ice cream cake at a birthday party? That perfect combination of soft cake, creamy ice cream, and those signature crunchy mix-ins created pure nostalgia. But here’s the thing: you don’t need to order from Carvel anymore to enjoy that iconic taste. Creating your own Carvel ice cream cake recipe at home is easier than you think, and honestly, it tastes just as delicious, if not better, because it’s made with your personal touch.
In this comprehensive guide, you’ll discover everything you need to know about crafting an authentic homemade Carvel ice cream cake recipe that will impress your family, wow your guests, and save you money compared to buying from the bakery. Whether you’re celebrating a special occasion or simply craving that nostalgic frozen treat, we’ve got you covered.
Understanding the Carvel Ice Cream Cake Recipe: What Makes It Special
The History and Appeal of Carvel Ice Cream Cake
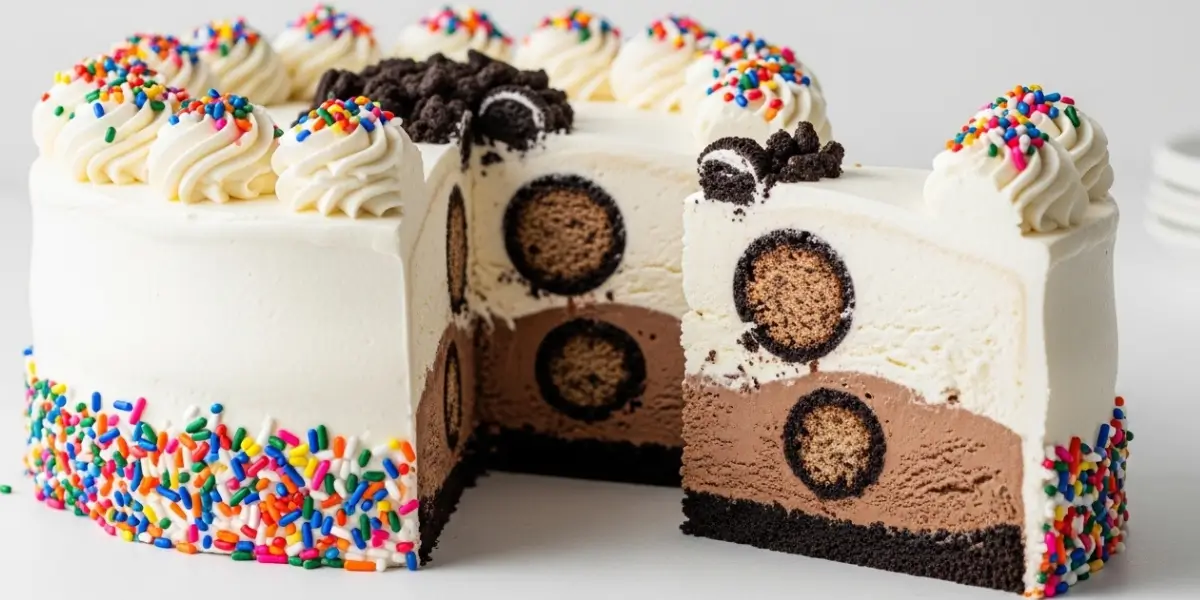
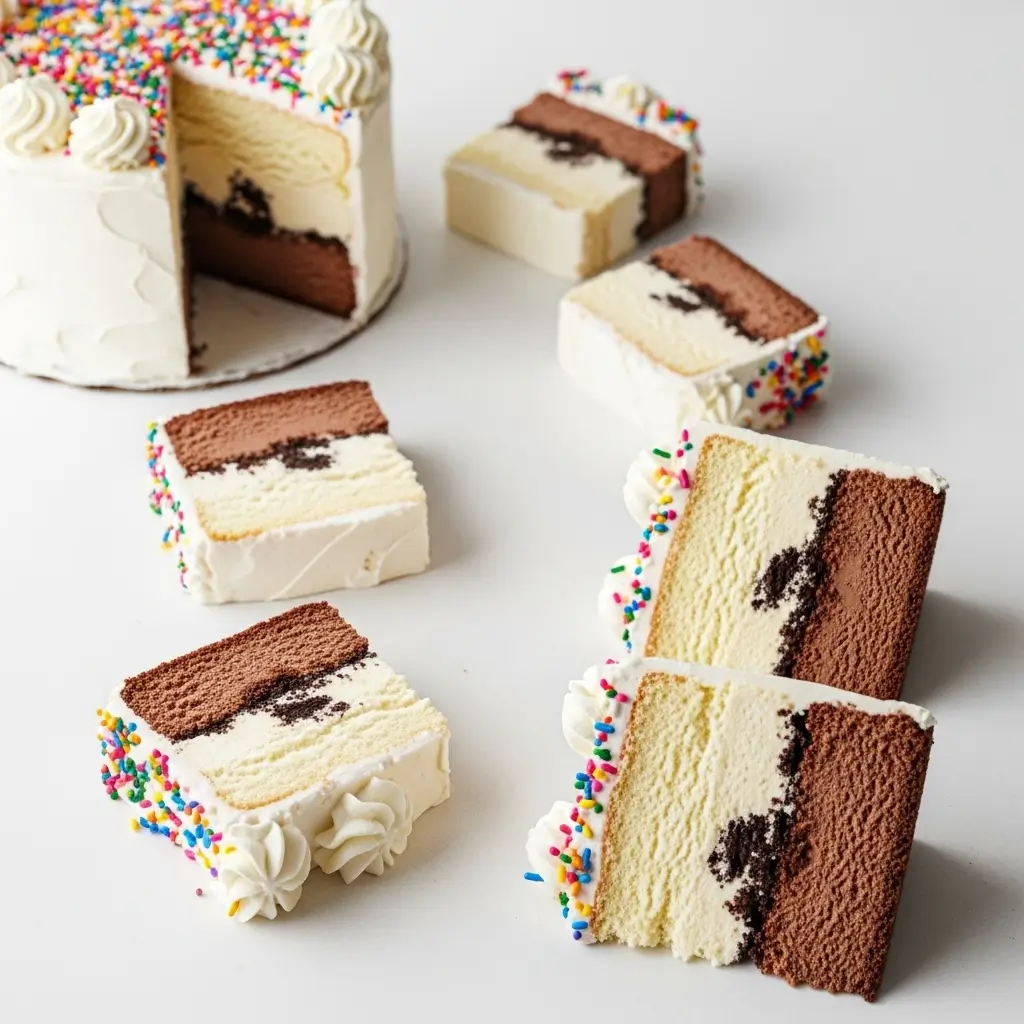
Carvel has been an American institution since 1934, beloved for its iconic ice cream cakes that grace birthday celebrations across the country. The magic of this recipe lies in its simplicity and comfort. It’s not overly complicated, but it hits all the right notes. The combination of layers creates texture contrast: the softness of the cake, the smoothness of ice cream, and the delightful crunch of mix-ins like Oreos or jimmies (sprinkles).
When you make your own Carvel ice cream cake recipe at home, you’re not just recreating a dessert; you’re capturing a feeling. You’re providing that same nostalgic, celebratory moment that Carvel has delivered for generations. The best part? You control every ingredient, so you can adjust sweetness levels, choose your favourite ice cream flavours, and even go dairy-free or sugar-free if needed.
Carvel ice cream cake recipe
Ingredients
Method
- Preheat oven to 350°F and prepare two 9-inch round cake pans with parchment paper and cooking spray
- Mix all dry ingredients (flour, baking powder, baking soda, salt, sugar) in a large bowl
- In a separate bowl, whisk together wet ingredients (butter, eggs, milk, vanilla extract)
- Combine dry and wet ingredients until smooth batter forms
- Divide batter evenly between prepared pans
- Bake for 12-15 minutes until a toothpick comes out with just a few moist crumbs
- Cool cake layers completely in pans for 10 minutes, then turn out onto wire racks
- Remove ice cream from freezer and let soften for 10-15 minutes until spreadable
- Place first cooled cake layer in a 9-inch springform pan or on a freezer-safe plate
- Spread softened ice cream evenly across first cake layer in ½-inch thickness
- Place second cake layer on top, pressing gently to secure
- Place assembled cake in freezer for at least 4 hours (overnight preferred)
- Prepare whipped cream frosting by whipping heavy cream with powdered sugar and vanilla extract
- Remove frozen cake from freezer 30 minutes before decorating
- Frost top and sides with whipped cream frosting using a piping bag
- Decorate with jimmies, sprinkles, crushed cookies, or chocolate chips
- Return to freezer until serving time
- Remove from freezer 5-10 minutes before serving for optimal texture
- Cut with a hot knife (run under hot water and wipe dry between cuts)
- Serve immediately and enjoy your homemade Carvel ice cream cake
Key Components of an Authentic Recipe
The foundation of any successful Carvel ice cream cake recipe consists of three essential layers: a tender cake base, premium ice cream filling, and decorative toppings. Understanding how each component contributes to the final product helps you execute your homemade version flawlessly.
The cake layer needs to be moist but sturdy enough to support the ice cream without falling apart when thawed slightly. Most ice cream cake recipes use a simple vanilla or chocolate cake as the base. The ice cream layer is where you can get creative. Traditional versions use vanilla, chocolate, or strawberry, but your homemade Carvel ice cream cake recipe can feature whatever flavours you love. Finally, the toppings, whether it’s crushed Oreos, chocolate chips, jimmies, or whipped cream, provide the visual appeal and textural interest that make every bite memorable.
Step-by-Step Recipe Instructions
Preparing Your Cake Base and Ingredients
Before diving into your Carvel ice cream cake, gather all ingredients and ensure your freezer has adequate space. Measure out your dry ingredients for the cake: all-purpose flour, baking powder, baking soda, salt, sugar, cocoa powder (if making chocolate), and vanilla extract. For the ice cream component of your Carvel ice cream cake, you’ll need softened ice cream, which means taking it out of the freezer about 15 minutes before assembly.
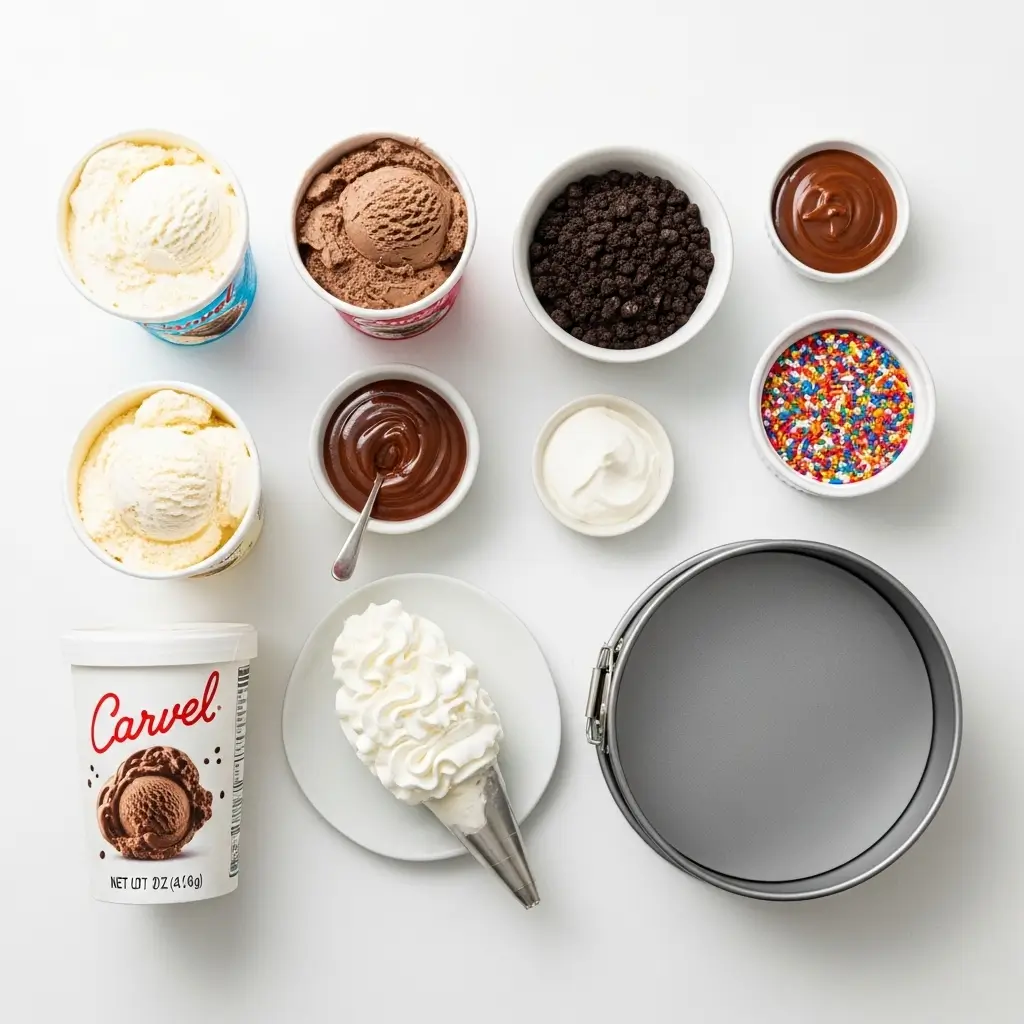
Start by preheating your oven to 350°F and preparing two round 9-inch cake pans with parchment paper and a light coating of cooking spray. The thin, delicate cake texture that defines a great Carvel ice cream cake requires proper pan preparation. Mix your dry ingredients in a large bowl, then whisk together your wet ingredients separately before combining them. The batter should be smooth and pourable. Divide evenly between your prepared pans and bake for 12-15 minutes until a toothpick inserted in the centre comes out with just a few moist crumbs.
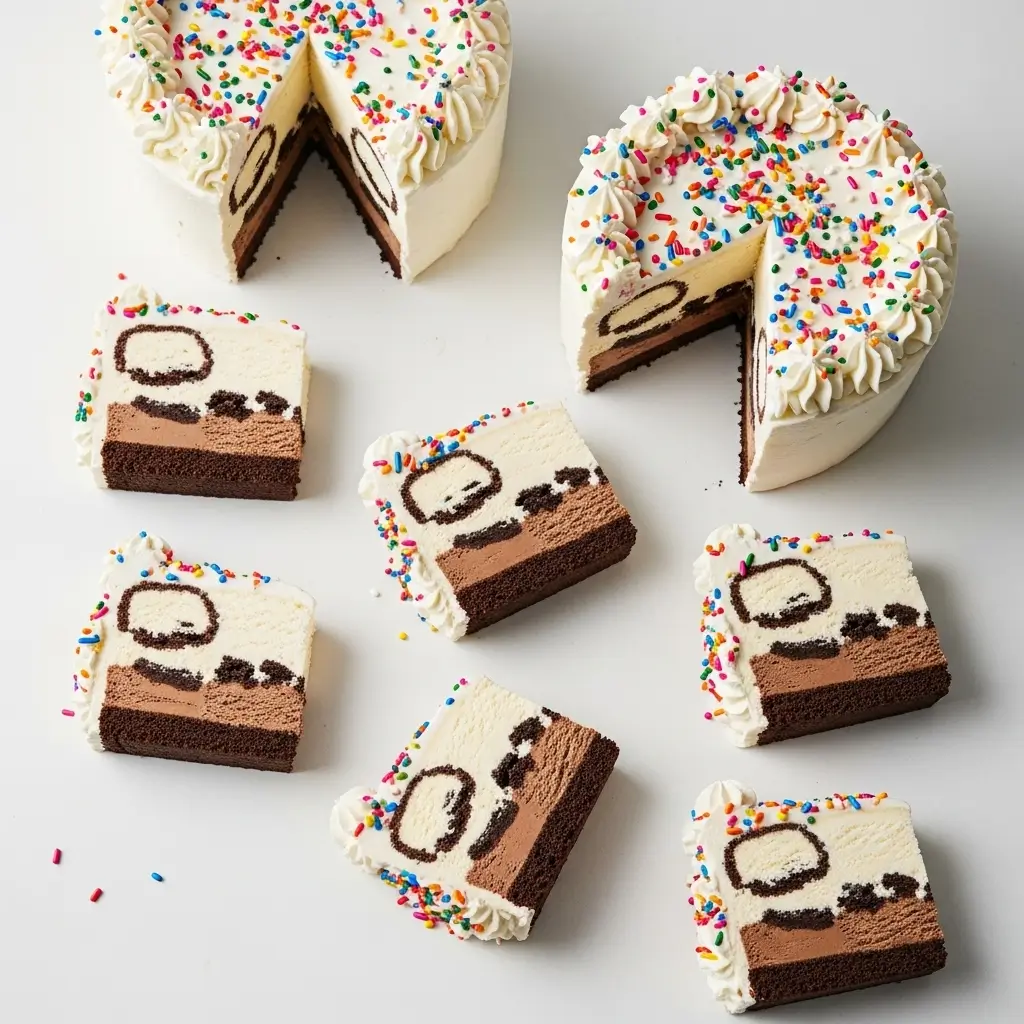
Assembling and Freezing Your Cake Recipe
Once your cake layers have cooled completely, and this is crucial for your Carvel ice cream cake, place the first layer in a 9-inch springform pan or on a freezer-safe plate. This is where your ice cream layer comes in. Take your softened ice cream and spread it evenly across the first cake layer, creating an even ½-inch thickness for optimal texture in every bite of your cake.
Place the second cake layer on top of the ice cream, pressing down gently to secure it. Now comes the freezing phase, which is essential for your Carvel ice cream cake to set properly. Place your assembled cake in the freezer for at least 4 hours, though overnight is ideal. Once frozen solid, you can frost and decorate according to your Carvel ice cream cake preferences. Many people use whipped cream frosting, buttercream, or leave it simple with just toppings.
Delicious Flavour Variations for Your Recipe
Classic Vanilla and Chocolate Combinations
The most iconic Carvel ice cream cake features a simple vanilla cake paired with vanilla or chocolate ice cream. This combination never disappoints because the flavours complement each other without competing. For the most authentic homemade Carvel ice cream cake experience, use premium vanilla ice cream; the flavour really shines when there are so few components involved.
If you prefer chocolate, a chocolate cake with chocolate ice cream is the ultimate crowd-pleaser for your Carvel ice cream cake recipe. You can add an extra layer of decadence by brushing the chocolate cake layers with a simple chocolate simple syrup before assembly, which keeps your Carvel ice cream cake recipe moist during the freezing process and enhances the chocolate flavour.
Creative Mix-In Options for Your Recipe
Your homemade Carvel ice cream cake recipe doesn’t have to stick to the classics. Consider mixing crushed Oreos or Thin Mints into your ice cream layer for added crunch and flavour. Brownie chunks work beautifully in a chocolate-based Carvel ice cream cake recipe. You could also try cookie dough pieces, peanut butter cup pieces, or even brownie bits for textural variety.
The beauty of making your own Carvel ice cream cake is that you can customise it to your exact preferences. Love cotton candy? Mix it into vanilla ice cream. Prefer salted caramel? Create a caramel swirl. Your homemade Carvel ice cream cake becomes a true reflection of your taste.
Storage, Serving, and Troubleshooting
| Element | Storage Method | Duration | Best Served |
|---|---|---|---|
| Assembled Cake | Use within 3–4 weeks for the best texture | Up to 2 weeks | Use within 3–4 weeks for the best texture |
| Individual Slices | Freezer with parchment between pieces | 10–14 days | Thaw 5 minutes before eating |
| Cake Layers Only | Freezer in plastic wrap | 1 month | Use within 3–4 weeks for best texture |
| Frosted Cake | Freezer covered loosely with plastic wrap | 2 weeks | Frost 1–2 hours before serving |
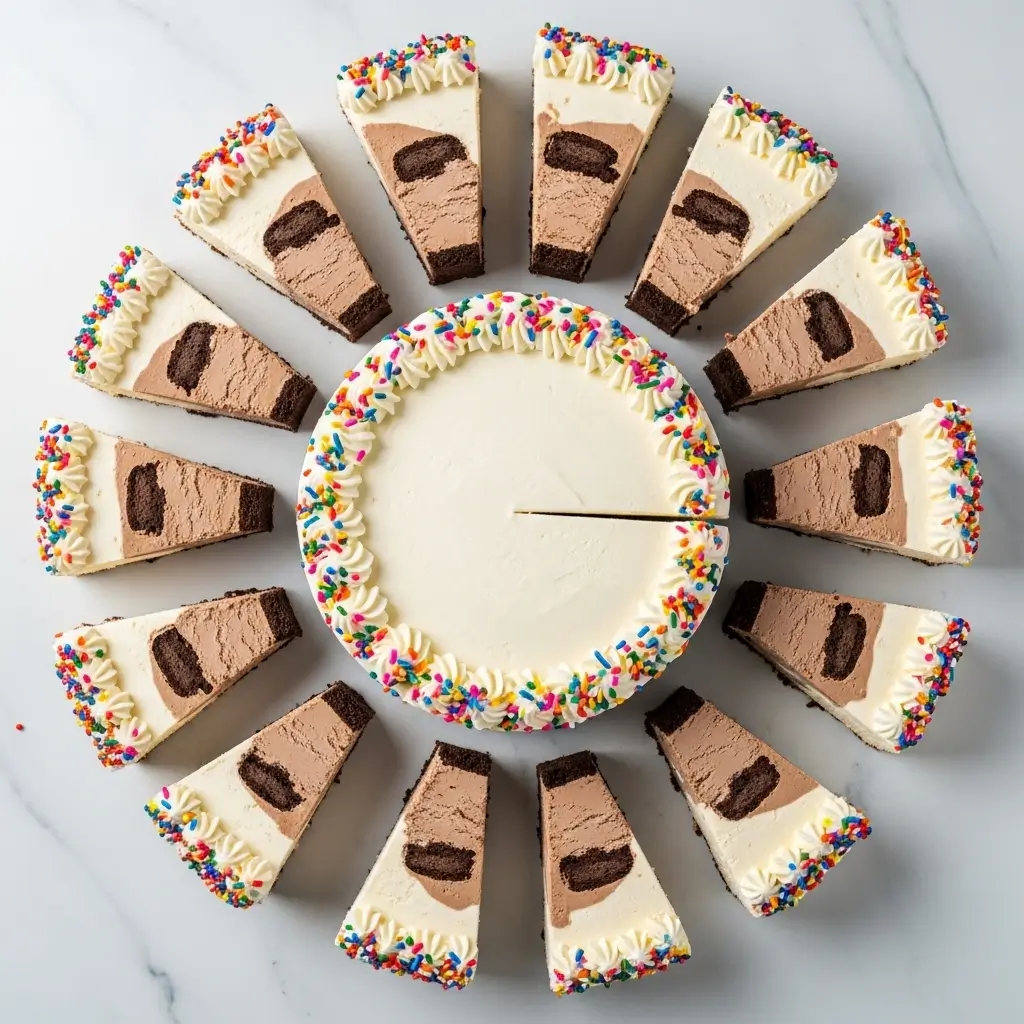
Serving Your Homemade Carvel Ice Cream Cake Recipe Perfectly
One of the best aspects of your Carvel ice cream cake is how forgiving it is when it comes to serving. Remove your cake from the freezer just 5-10 minutes before cutting to achieve that perfect texture soft enough to bite through easily, but still cold and creamy. A hot knife (run it under hot water and wipe dry between cuts) makes slicing your Carvel ice cream cake recipe remarkably clean and easy.
For the most professional-looking presentation of your Carvel ice cream cake recipe, let it sit at room temperature for 15-20 minutes if you have time. This allows the cake to soften slightly while the ice cream remains perfectly scoopable. Your guests will appreciate the improved texture, and your Carvel ice cream cake recipe will look restaurant-quality on their plates.
Troubleshooting Common Issues with Your Recipe
If your homemade Carvel ice cream cake recipe develops ice crystals, it typically means it’s been stored too long or exposed to temperature fluctuations. To prevent this with your Carvel ice cream cake recipe, wrap it well before freezing and avoid opening your freezer frequently. If the cake layers are too dry in your Carvel ice cream cake recipe, brush them with a simple syrup (equal parts sugar and water, boiled and cooled) before assembly.
If your Carvel ice cream cake recipe slides around during cutting, try chilling your cutting knife in the freezer for a few minutes before slicing. Sometimes the cake won’t freeze solid enough for your Carvel ice cream cake recipe. This usually means you need additional time in the freezer, or the ice cream wasn’t cold enough when you began assembly. Room temperature during assembly can soften everything too quickly, so keep your workspace cool when making your recipe.
Recipe Comparison: Homemade vs. Store-Bought
| Factor | Homemade Carvel Recipe | Store-Bought Carvel | Winner |
|---|---|---|---|
| Cost (8-inch cake) | $15–20 | $30–45 | Homemade |
| Customization | Unlimited | Limited | Homemade |
| Ingredient Control | Complete | Limited transparency | Homemade |
| Convenience | Requires planning | Ready when ordered | Store-Bought |
| Freshness | Can control timing | Unknown storage duration | Homemade |
| Flavor Variety | Any combination possible | Pre-set options | Homemade |
| Storage Flexibility | Your freezer | Pickup deadline pressure | Homemade |
FAQ: Everything You Need to Know
Can I make a Carvel ice cream cake without an ice cream maker?
Absolutely! In fact, most homemade Carvel ice cream cake recipes don’t require an ice cream maker at all. You simply use store-bought ice cream, softened to a spreadable consistency. This is one of the biggest advantages of making your own Carvel ice cream cake recipe: it’s incredibly accessible. Just allow your chosen ice cream to sit at room temperature for 10-15 minutes before spreading it onto your cake layer.
How far in advance can I prepare my Carvel ice cream cake recipe?
Your recipe can be made up to two weeks in advance if stored properly in an airtight container in the freezer. This makes your Carvel ice cream cake recipe perfect for party planning, as you can prepare it weeks ahead without stress. However, for the best texture and flavour, try to make your recipe within 7-10 days of serving.
What’s the best way to decorate a homemade Carvel ice cream cake recipe?
Decoration options for your Carvel ice cream cake recipe are virtually limitless. The classic approach involves whipped cream frosting applied with a piping bag to create those signature Carvel rosettes. You can also keep your Carvel ice cream cake recipe simple by topping it with jimmies, crushed cookies, chocolate chips, or fresh fruit. Some people prefer a smooth buttercream finish for their recipe, while others love the rustic look of whipped cream. The key is to decorate your recipe just before serving, as whipped cream can weep if sitting too long.
Final Thoughts: Creating Your Perfect Carvel Ice Cream Cake Recipe
Making a homemade Carvel ice cream cake recipe is more than just following instructions; it’s about creating a dessert that brings joy to your table. Whether you’re a baking novice or an experienced baker, your Carvel ice cream cake recipe project will reward you with delicious results and the satisfaction of knowing exactly what goes into every bite.
The beauty of your homemade Carvel ice cream cake recipe lies in its flexibility. You can make it exactly as you’ve always loved it, or you can innovate and create new flavour combinations that become your signature. You can adjust sweetness levels, experiment with mix-ins, and tailor everything to your dietary preferences.
The next time someone asks where you got your incredible ice cream cake, you’ll smile knowing you made this delicious Carvel ice cream cake recipe from scratch. Your guests will be impressed, your taste buds will thank you, and you’ll save money in the process. That’s a win across the board.
Ready to impress your loved ones? Gather your ingredients today and create your own memorable Carvel ice cream cake recipe. Share your results in the comments below. We’d love to hear about your favourite flavour or combinations and decorating techniques!
